
NVIDIA® OptiX上で『レイマーチング×パストレーシング』による物理ベースレンダラーを実装した
これはレイトレ合宿7アドベントカレンダーの記事です。
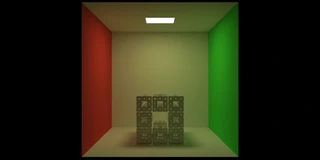
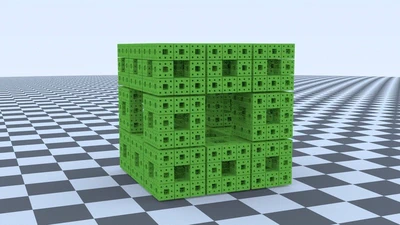
NVIDIA® OptiX上で『レイマーチング×パストレーシング』による物理ベースレンダラーを開発しました。
レイとオブジェクトの交差判定をレイマーチングで行い、ライティングをパストレーシングをするという、レイマーチングとパストレーシングのハイブリッドなレンダリングを実現しました。
NVIDIA® OptiX上で
— がむ (@gam0022) July 28, 2019
『レイマーチング×パストレーシング』
を実装できた😉 #レイトレ合宿 pic.twitter.com/FKbuHiXqmP
実装の方針
Optixは、CUDA基盤上で動作する、NVIDIA製のGPUレイトレーシング用フレームワークです。
Optixではユーザ独自のプリミティブを定義できるため、この機能をつかってレイマーチングで衝突判定を行う距離関数のプリミティブを定義しました。
独自のプリミティブの定義に必要なProgram(Optix用語でPTXアセンブリにコンパイルされたCUDA C関数を指す)は次の2つです。
- Bounding Box
- Intersection
Optixの公式サンプルプロジェクトに optixPathtracing(パストレーシングの実装例)があったので、これにレイマーチングのプリミティブを追加する形で実装しました。
パストレーシングの処理はサンプルコードの実装そのまま利用させていただきました。
Bounding Box
Bounding Boxを定義するProgramです。
レイマーチングのオブジェクトのBounding BoxはC++側から値を渡すようにしました。
rtDeclareVariable でCPUからGPUへ送るバッファの宣言(GLSLのunifromと同じ)ができます。
#include <optix_world.h>

rtDeclareVariable(float3, center, , );
rtDeclareVariable(float3, size, , );

RT_PROGRAM void bounds(int, float result[6])
{
    optix::Aabb* aabb = (optix::Aabb*)result;
    aabb->m_min = center - size;
    aabb->m_max = center + size;
}
Intersection
衝突判定をするProgramです。
ごくごく普通のレイマーチングです。
rtDeclareVariable(int, lgt_instance, , ) = {0};
rtDeclareVariable(float3, texcoord, attribute texcoord, );
rtDeclareVariable(int, lgt_idx, attribute lgt_idx, );

RT_PROGRAM void intersect(int primIdx)
{
    const float EPS = 1e-2;
    float t = 0.0, d = 1e100;
    float3 p = ray.origin;

    for (int i = 0; i < 50; i++)
    {
        d = map(p);
        t += d;
        p = ray.origin + t * ray.direction;
        if (abs(d) < EPS)
        {
            break;
        }
    }

    if (abs(d) < EPS && rtPotentialIntersection(t))
    {
        shading_normal = geometric_normal = calcNormal(p, map);
        texcoord = make_float3(p.x, p.y, 0);
        lgt_idx = lgt_instance;
        rtReportIntersection(0);
    }
}
法線計算
法線計算は四面体によるアプローチを用いました。
通常は6回の距離関数の評価が必要なところ、4回の評価だけで法線を計算できます。
- normals for an SDF | http://iquilezles.org
- #TokyoDemoFest 2018 の GLSL Graphics Compo で2位入賞しました - setchi’s blog
map関数を差し替え可能にするためにマクロをつかって実装しました。
const float EPS_N = 1e-4;
#define calcNormal(p, dFunc) normalize(\
    make_float3( EPS_N, -EPS_N, -EPS_N) * dFunc(p + make_float3( EPS_N, -EPS_N, -EPS_N)) + \
    make_float3(-EPS_N, -EPS_N,  EPS_N) * dFunc(p + make_float3(-EPS_N, -EPS_N,  EPS_N)) + \
    make_float3(-EPS_N,  EPS_N, -EPS_N) * dFunc(p + make_float3(-EPS_N,  EPS_N, -EPS_N)) + \
    make_float3( EPS_N,  EPS_N,  EPS_N) * dFunc(p + make_float3( EPS_N,  EPS_N,  EPS_N)))
距離関数
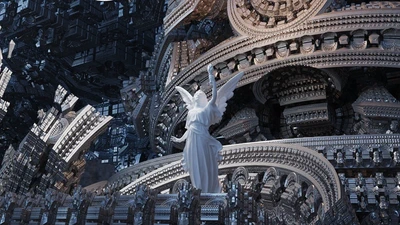
以前にブログで紹介したIFSによるMengerSpongeの距離関数をCUDA Cに移植しました。
Swizzle Operationを手動展開するのがしんどかったです…
ベクトル版のabsやmaxは自分で定義すれば解決しますが、Swizzle OperationをCUDA C上で再現する方法は私には分かりませんでした。
CUDA C言語、absやmaxにベクトル型のオーバーロードが無いし、Swizzle Operationも無いからストレスで発狂して精神が崩壊した🤬🤪🤮 pic.twitter.com/mRPmQTTcsb
— がむ (@gam0022) July 28, 2019
float dMenger(float3 z0, float3 offset, float scale) {
    float4 z = make_float4(z0, 1.0);
    for (int n = 0; n < 4; n++) {
        // z = abs(z);
        z.x = abs(z.x);
        z.y = abs(z.y);
        z.z = abs(z.z);
        z.w = abs(z.w);

        // if (z.x < z.y) z.xy = z.yx;
        if (z.x < z.y)
        {
            float x = z.x;
            z.x = z.y;
            z.y = x;
        }

        // if (z.x < z.z) z.xz = z.zx;
        if (z.x < z.z)
        {
            float x = z.x;
            z.x = z.z;
            z.z = x;
        }

        // if (z.y < z.z) z.yz = z.zy;
        if (z.y < z.z)
        {
            float y = z.y;
            z.y = z.z;
            z.z = y;
        }

        z *= scale;
        // z.xyz -= offset * (scale - 1.0);
        z.x -= offset.x * (scale - 1.0);
        z.y -= offset.y * (scale - 1.0);
        z.z -= offset.z * (scale - 1.0);

        if (z.z < -0.5 * offset.z * (scale - 1.0))
            z.z += offset.z * (scale - 1.0);
    }
    // return (length(max(abs(z.xyz) - make_float3(1.0, 1.0, 1.0), 0.0)) - 0.05) / z.w;
    return (length(make_float3(max(abs(z.x) - 1.0, 0.0), max(abs(z.y) - 1.0, 0.0), max(abs(z.z) - 1.0, 0.0))) - 0.05) / z.w;
}

float map(float3 p)
{
    float scale = 100;
    return dMenger((p - center) / scale, make_float3(1, 1, 1), 3.1) * scale;
}
C++からProgramの利用
Programを利用するには以下のようなC++のコードを書けばOKです。
ProgramとGPUに送る情報のバッファを指定しているだけです。
Context        context = 0;
Program        pgram_raymarching_intersection = 0;
Program        pgram_raymarching_bounding_box = 0;

// レイマーチングのオブジェクトの GeometryInstance を生成します
GeometryInstance createRaymrachingObject(
    const float3& center,
    const float3& size)
{
    Geometry raymarching = context->createGeometry();
    raymarching->setPrimitiveCount(1u);
    raymarching->setIntersectionProgram(pgram_raymarching_intersection);
    raymarching->setBoundingBoxProgram(pgram_raymarching_bounding_box);

    raymarching["center"]->setFloat(center);
    raymarching["size"]->setFloat(size);

    GeometryInstance gi = context->createGeometryInstance();
    gi->setGeometry(raymarching);
    return gi;
}

// ジオメトリのセットアップをします
// ※レイマーチングに直接関係ないコードは省略しています
void loadGeometry()
{
    // Set up Raymarching programs
    const char *ptx = sutil::getPtxString( SAMPLE_NAME, "optixRaymarching.cu" );
    pgram_raymarching_bounding_box = context->createProgramFromPTXString( ptx, "bounds" );
    pgram_raymarching_intersection = context->createProgramFromPTXString( ptx, "intersect" );

    // create geometry instances
    std::vector<GeometryInstance> gis;

    // Raymarcing
    gis.push_back(createRaymrachingObject(
        make_float3(278.0f, 120.0f, 278.0f),
        make_float3(100.0f, 100.0f, 100.0f)));
    setMaterial(gis.back(), diffuse, "diffuse_color", white);

    // Create geometry group
    GeometryGroup geometry_group = context->createGeometryGroup(gis.begin(), gis.end());
    geometry_group->setAcceleration( context->createAcceleration( "Trbvh" ) );
    context["top_object"]->set( geometry_group );
}
Optixの環境構築(Windows)
OptixのWindows用の環境構築の流れは
- 必要なツールを事前にインストール
- CamkeでVisualStudioのソリューションファイルを生成
- VisualStudioでビルド
という感じでした。
morishigeさんのQiitaの記事が大変参考になりました。
CmakeとOptixとCUDAのバージョンの組み合わせが肝のようで、Cmakeのバージョンを変えながら何回かトライしたところ、この組み合わせでCmakeビルドに成功しました。
✍️
— がむ (@gam0022) July 15, 2019
CUDA 10.1
OptiX SDK 6.0.0
Visual Studio 2017
Cmake 3.8.2
freeglut / GLFW / GLEW は Nuget の最新版をインストールhttps://t.co/OtsR6bnxmk
Cmakeの設定はスクショ通り pic.twitter.com/cpBM4y2Vy1
CmakeでVisual Studioのバージョンを選択する際、誤って64bit版ではなく32bit版を選択してしまい、Cmake自体は成功するもののソリューションがビルドできないことがありました。
Cmakeの過去のバージョンはGitHubからインストールできます。
サンプルコードの改造
サンプルコードの改造方法はNVIDIA Developer Forumsにあります。
Adding a new example is very simple:
- Copy one of the optixIntro_01 (this is effectively optixHello) to optixIntro_10 folders,
- rename it,
- rename the project name in its copied CMakeLists.txt,
- add your new subdirectory in the CMakeLists.txt one folder above,
- rebuild the solution with CMake GUI. Done.
Your new project appears and would do the same thing as the example you copied it from. Now change it as you like.
参考資料
以下の記事が大変参考になりました。ありがとうございます。
Related Posts
レイトレ合宿10でポータルをテーマにしたアニメーションを作成しました
10月11日(金)~10月13日(日)に熱海の初島で開催されたレイトレ合宿10に参加しました。
レイトレ合宿9で4次元立方体をテーマにしたアニメーションを作成しました
9月1日(金)~9月3日(日)に日蓮宗大本山清澄寺で開催されたレイトレ合宿9に参加しました。
Books
ブログ執筆者の著書


